Managing app permissions in React Native

iOS Developer at Hepsiburada
When you are developing a mobile application with advanced features, you will most likely need to get permission from the user.
Applications should not be able to directly access the user’s camera, microphone, location, and so on in order to protect the user. We need to respect user privacy by seeking permission to capture and store photos, audio, and video.
Let’s check on Facebook to see an example of camera permission. You are familiar with these alerts, right?
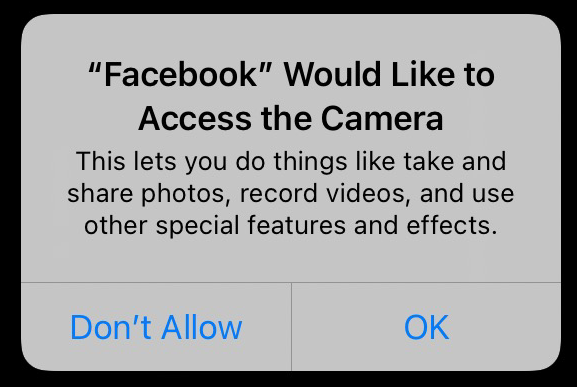
To be able to present your application fully, your users have to give permission. But what if the user denies it? As you may guess, you can’t provide that feature. Therefore, permissions are essential.
What if we are developing a photo editing application? The solution is simple: we need to get their permission to access their data. In this article, we are going to dive into permissions and how we can get permissions in React Native by using zoontek’s react-native-permissions library.
Unfortunately, React Native doesn’t support getting permissions. Luckily, there is a popular third-party library we can use: Mathieu Acthernoene’s react-native-permissions library.
Let’s assume we want to ask for camera permission. The steps are easy to do.
To start, make sure you add this library to the project:
$ npm install --save react-native-permissions
--or--
$ yarn add react-native-permissions
Then, be sure you import the library by writing at the top of your file where you’ll handle these permissions:
import \* as permissions from 'react-native-permissions';
// you may also import just the functions or constants that you will use from this library
import {request, PERMISSIONS} from 'react-native-permissions';
react-native-permissions for iOS devices
- Make sure you add all wanted permissions to your app’s
Podfileand run this command:
pod install
CocoaPods is a dependency manager for Swift and Objective-C Cocoa projects. The Podfile is a specification that describes the dependencies of the targets of one or more Xcode projects. Running pod install helps you to install the dependencies. You can check out CocoaPods here to read more.
→ In our case, we will add
pod 'Permission-Camera', :path => "#{permissions\_path}/Camera"
to Podfile and run pod install.
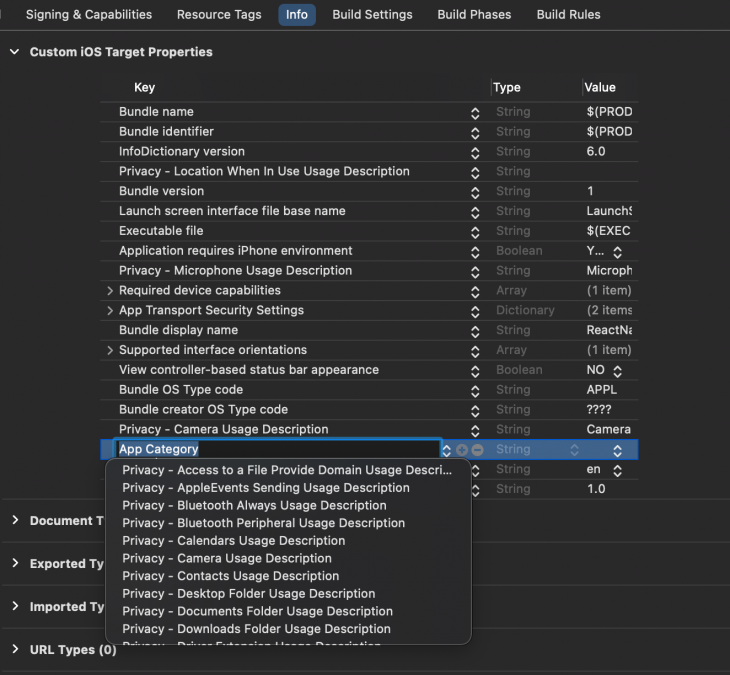
- Update the
Info.plistwith wanted permissions usage descriptions. You may achieve this in two ways; choose which suits you.
Option 1: Xcode
- Open the Info section
- Add a new line
- Select which permission you would like from the options as a key
- Add value to that key
→ In our case, we will select Privacy – Camera Usage Description.
Option 2: Text Editor
- Open
Info.plistfile - Copy key and string values from the following and paste that file
- Update the string value according to your need:
<?xml version="1.0" encoding="UTF-8"?>
    <!DOCTYPE plist PUBLIC "-//Apple//DTD PLIST 1.0//EN" "http://www.apple.com/DTDs/PropertyList-1.0.dtd">
    <plist version="1.0">
    <dict>
      <!-- 🚨 Keep only the permissions used in your app 🚨 -->
      <key>NSAppleMusicUsageDescription</key>
      <string>YOUR TEXT</string>
      <key>NSBluetoothAlwaysUsageDescription</key>
      <string>YOUR TEXT</string>
      <key>NSBluetoothPeripheralUsageDescription</key>
      <string>YOUR TEXT</string>
      <key>NSCalendarsUsageDescription</key>
      <string>YOUR TEXT</string>
      <key>NSCameraUsageDescription</key>
      <string>YOUR TEXT</string>
      <key>NSContactsUsageDescription</key>
      <string>YOUR TEXT</string>
      <key>NSFaceIDUsageDescription</key>
      <string>YOUR TEXT</string>
      <key>NSLocationAlwaysAndWhenInUseUsageDescription</key>
      <string>YOUR TEXT</string>
      <key>NSLocationAlwaysUsageDescription</key>
      <string>YOUR TEXT</string>
      <key>NSLocationTemporaryUsageDescriptionDictionary</key>
      <dict>
        <key>YOUR-PURPOSE-KEY</key>
        <string>YOUR TEXT</string>
      </dict>
      <key>NSLocationWhenInUseUsageDescription</key>
      <string>YOUR TEXT</string>
      <key>NSMicrophoneUsageDescription</key>
      <string>YOUR TEXT</string>
      <key>NSMotionUsageDescription</key>
      <string>YOUR TEXT</string>
      <key>NSPhotoLibraryUsageDescription</key>
      <string>YOUR TEXT</string>
      <key>NSPhotoLibraryAddUsageDescription</key>
      <string>YOUR TEXT</string>
      <key>NSRemindersUsageDescription</key>
      <string>YOUR TEXT</string>
      <key>NSSpeechRecognitionUsageDescription</key>
      <string>YOUR TEXT</string>
      <key>NSSiriUsageDescription</key>
      <string>YOUR TEXT</string>
      <key>NSUserTrackingUsageDescription</key>
      <string>YOUR TEXT</string>

      <!-- … -->
    </dict>
    </plist>
→ In our case, it is as follows:
<key>NSCameraUsageDescription</key>
    <string>YOUR TEXT</string>
The value section in the first option and the <string> section in the second option correspond to the text inside the alert message.
Let’s recall the Facebook camera permission alert. The description part is the text you give as the value here:
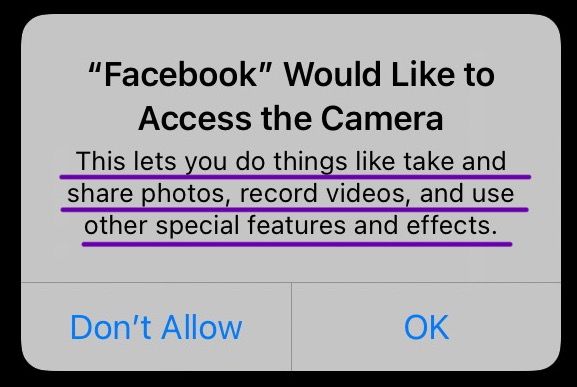
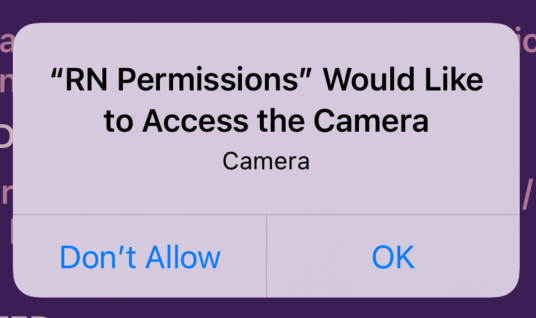
→ In our case, I just gave “Camera” to the value, and here it looks like this:
react-native-permissions for Android
- Add all wanted permissions to your app’s
android/app/src/main/AndroidManifest.xmlfile:
<manifest xmlns:android="http://schemas.android.com/apk/res/android"
      package="com.myawesomeapp">
      <!-- 🚨 Keep only the permissions used in your app 🚨 -->
      <uses-permission android:name="android.permission.ACCEPT\_HANDOVER" />
      <uses-permission android:name="android.permission.ACCESS\_BACKGROUND\_LOCATION" />
      <uses-permission android:name="android.permission.ACCESS\_COARSE\_LOCATION" />
      <uses-permission android:name="android.permission.ACCESS\_FINE\_LOCATION" />
      <uses-permission android:name="android.permission.ACTIVITY\_RECOGNITION" />
      <uses-permission android:name="android.permission.ANSWER\_PHONE\_CALLS" />
      <uses-permission android:name="android.permission.BODY\_SENSORS" />
      <uses-permission android:name="android.permission.CALL\_PHONE" />
      <uses-permission android:name="android.permission.CAMERA" />
      <uses-permission android:name="android.permission.GET\_ACCOUNTS" />
      <uses-permission android:name="android.permission.PROCESS\_OUTGOING\_CALLS" />
      <uses-permission android:name="android.permission.READ\_CALENDAR" />
      <uses-permission android:name="android.permission.READ\_CALL\_LOG" />
      <uses-permission android:name="android.permission.READ\_CONTACTS" />
      <uses-permission android:name="android.permission.READ\_EXTERNAL\_STORAGE" />
      <uses-permission android:name="android.permission.READ\_PHONE\_NUMBERS" />
      <uses-permission android:name="android.permission.READ\_PHONE\_STATE" />
      <uses-permission android:name="android.permission.READ\_SMS" />
      <uses-permission android:name="android.permission.RECEIVE\_MMS" />
      <uses-permission android:name="android.permission.RECEIVE\_SMS" />
      <uses-permission android:name="android.permission.RECEIVE\_WAP\_PUSH" />
      <uses-permission android:name="android.permission.RECORD\_AUDIO" />
      <uses-permission android:name="android.permission.SEND\_SMS" />
      <uses-permission android:name="android.permission.USE\_SIP" />
      <uses-permission android:name="android.permission.WRITE\_CALENDAR" />
      <uses-permission android:name="android.permission.WRITE\_CALL\_LOG" />
      <uses-permission android:name="android.permission.WRITE\_CONTACTS" />
      <uses-permission android:name="android.permission.WRITE\_EXTERNAL\_STORAGE" />
      <uses-permission android:name="com.android.voicemail.permission.ADD\_VOICEMAIL" />

      <!-- … -->

</manifest>
→ In our case, we need to add only camera permission to the AndroidManifest.xml file:
Requesting the permission: return types
request(Platform.OS === 'ios' ? PERMISSIONS.IOS.CAMERA : PERMISSIONS.ANDROID.CAMERA).then((result) => {
        setPermissionResult(result)
        console.log(result)
      });
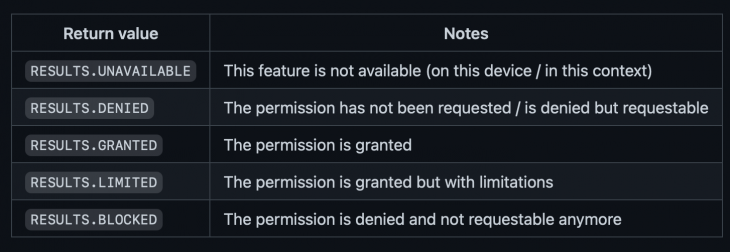
The return types and the meanings are here:
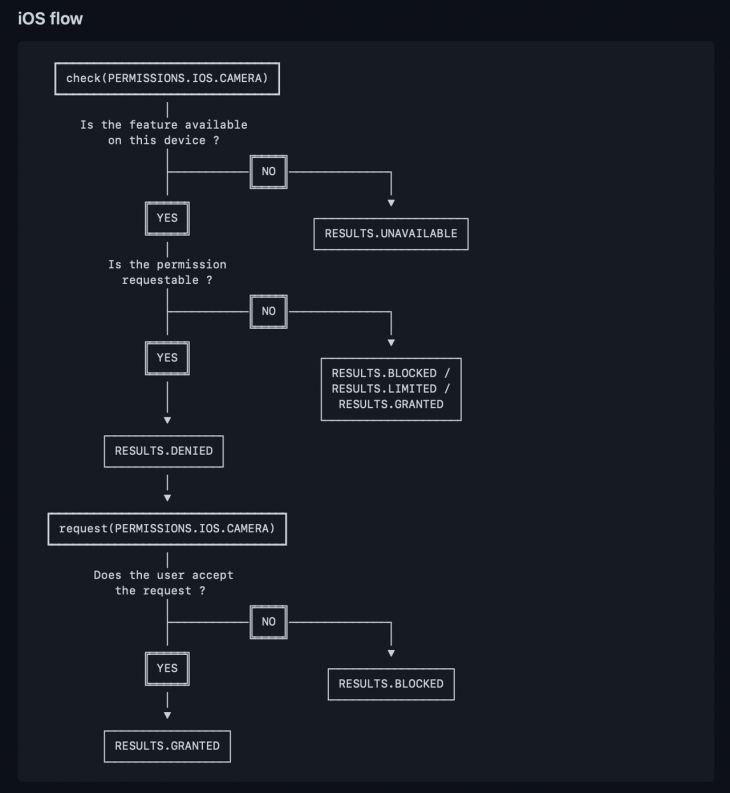
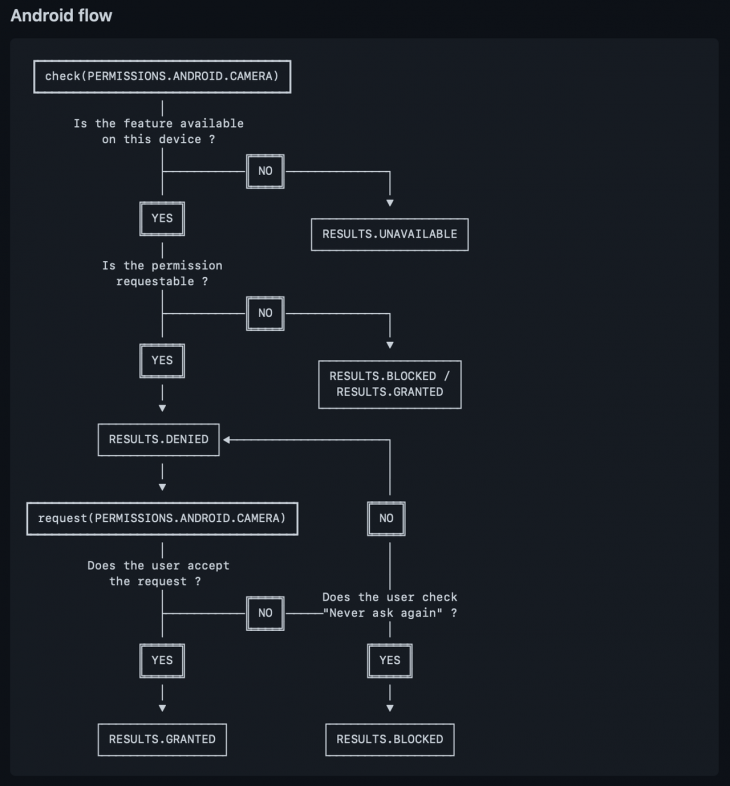
The flow differs by the operating system. Here, there is the flow chart for permissions for iOS and Android, which is taken from the documentation of this library.
The final product
Voila! You are ready to run your code! Basically, that’s it!
You may still encounter a few problems, like maybe your device doesn’t support that feature or the version is not valid. My advice: the first place where you check for the solution should be the documentation of the library.
While writing this post, I built an example React Native application that includes camera and microphone permissions. It shows the result of the permission and the explanation of the result.
You may play with it, see the result types, and observe when that result is returned. You may first approve it, then change the permission in Settings, open the application, and see what happens. Work with it to understand better!
You may also use the sample for testing while you are coding for specific occasions. Other than playing with the sample, you can check out the source code, and if you are having trouble with anything, you can compare it with mine!
When I was about to finish my example project, I found out zoontek also made an example app for this just like mine but including every permission! You can check out zoontek’s example application here.
Key points for configuring permissions
Permission appearance
Bear in mind that if you answer a permission request, it won’t ask for that permission again. If you want it to appear again, delete and install the app.
If you only want to change the result, you may change it on the settings of your device.
In iOS, the user must explicitly grant permission for each app to access the camera and microphone. Before your app can use the capture system for the first time, the operating system shows an alert asking the user to grant your app access to the camera. They remember the user’s response to this alert, so it doesn’t reappear each time you access a user’s camera.
The user can change permission settings for your app in Settings > Privacy in iOS, or
Settings > Apps > “Your App Name” > Permissions in Android.
Dangerous permissions
Previously in Android development, every permission had to be added in the AndroidManifest.xml file. They were called Install-Time Permissions, and they were requested at the installation time at the Google Play Store.
Starting from Android 6.0 (API 23), the dangerous permissions, in other words run-time permissions, concept came up and these permissions became necessary to ask in runtime rather than install-time. Runtime permissions are the alert dialog boxes that come up when the app is running.
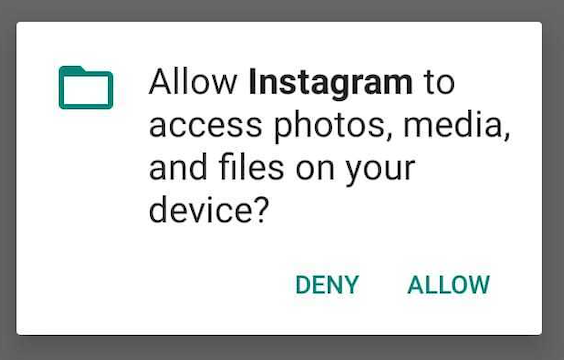
Let’s examine Instagram for permissions. When we check Instagram on Google Play Store, we see a bunch of permissions.
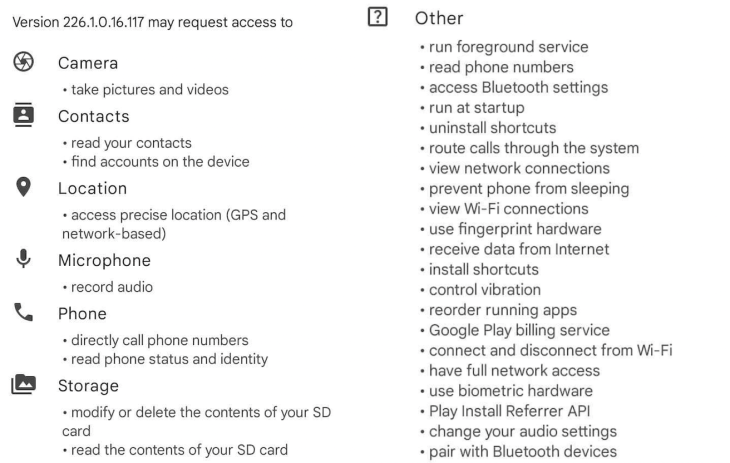
User’s camera, contacts, location, microphones, phones, and storage are their sensitive information. Therefore, they are dangerous permissions. So, in the Android 6.0 and later versions, users see run-time permissions when they are using the app; here, it’s Instagram.
When a user is trying to post a photo or a video, the run-time permission dialog comes up on the screen.
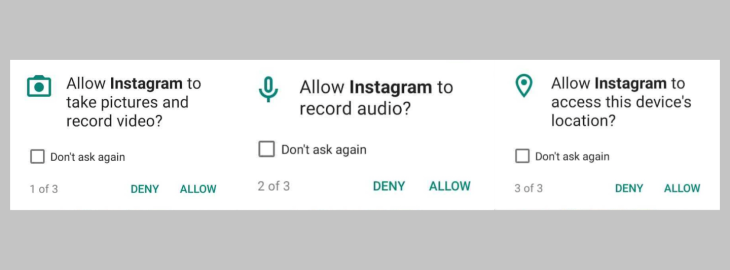
Similarly, when a user attempts to take a photo or a video on Instagram, these permissions come up.
Android 11 permission updates
In the Android ecosystem, there have been changes that come with Android 11:
- If your application requests permission related to camera, microphone, or location, the permission dialog includes the “Only this time” option. If it is selected, your app is granted permission for one time. It is called “one-time permission.” The second time the app is opened, the permission dialog comes up again
- If your application hasn’t been used for a few months, the system automatically resets the sensitive runtime permissions that the user had granted for the app
To learn more, go check out Android 11’s updates.
iOS 14.5: App Tracking Transparency
For iOS 14.5, iPadOS 14.5, and tvOS 14.5 and newer, developers are required to ask users for their permission to track them across apps and websites owned by other companies. One of the best features of this library is that it is up-to-date. You may add an AppTrackingTransparency (ATT) prompt and request by using react-native-permissions. Remember, only iOS devices version 14.5 or newer are able to request this.
When to ask permissions for the best user experience 🤗
Asking for permissions in the onboarding of the application or asking them at the specific time that you need is still a user experience debate. There is not an answer; there are opinions.
What I would suggest is asking when you need it. As a user, seeing all the permissions in the onboarding scares me, and most of the time I don’t give the full permissions. As I said before, this is open to debate. Choose what suits you.
Conclusion
We have covered the concept of permissions and how we can get them in React Native by using react-native-permissions. I gave you the key points you may need in your permission journeys, such as the Android 11 and iOS 14.5 changes. You can find my example project in this GitHub repository.
I hope you have enjoyed this article and your users give the full permissions to get benefit from your application features! If you have any feedback, feel free to reach out. Until next time, take care!
References
The post Managing app permissions in React Native appeared first on LogRocket Blog.