Meet my latest project: a Figma Plugin for resizing screenshots

iOS Developer at Hepsiburada
I was at the beginning of my career and wanted to build a product. I was planning to build an iOS application as my first product. However, things changed and I decided to develop a Figma Plugin.
Before we start, you may access the plugin that I built - called Screenshot Resizer - from here and the demo video is here. In this article, I am going to share the story of that product, the process of building it in TypeScript, and the useful resources that I have used throughout this journey.
Background Story
As a mobile developer, I use design tools a lot to get the design from the design team in our company. I got a request from one of my designer co-workers, Ersin Kıymaz, about developing a Sketch plugin when using Sketch in our company. To be honest, I procrastinated it. Then, after a year, we switched to using Figma in our company instead of Sketch and he again requested a plugin from me for Figma.
Identifying the problem
During his design process, he often takes screenshots from the mobile applications on his phone and imports them into Figma. He checks for the widths, heights, margins, paddings, and so on. The problem here is when you add a screenshot to Figma, it seems a lot bigger because it imports according to the device’s physical width and height. Let’s dive in to understand clearly.
There are two concepts here, point and pixel. A point consists of pixels. If a point has more pixels, the screen looks sharper. The below image gives an example of some devices. iPhone 6 Plus looks sharper than iPhone 6 because it has more pixels.
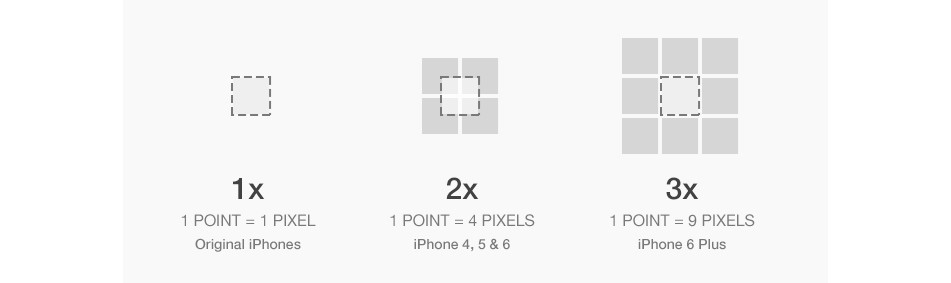 Source: https://www.linkedin.com/pulse/difference-between-point-pixel-charanjeet-singh/
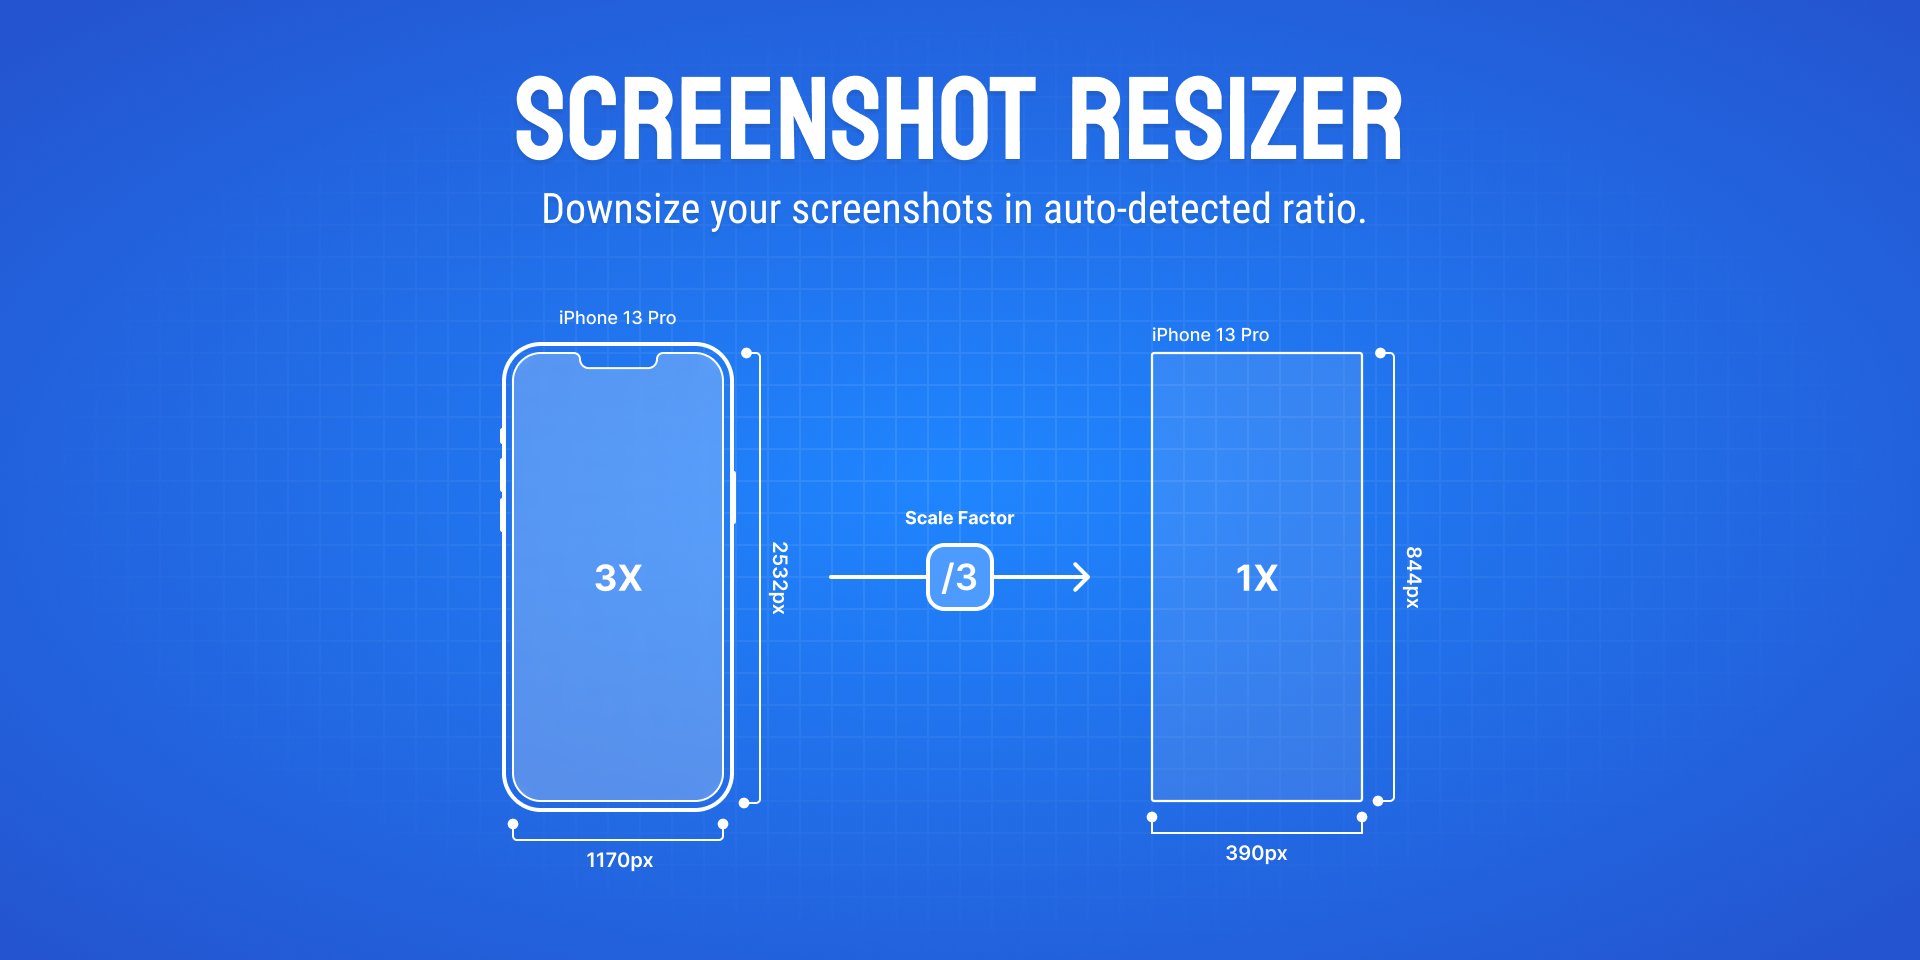
For instance, let’s say we have iPhone 13 Pro Max. This device’s screen has 1284 points in width and 2778 points in height. If you create a prototype on Figma for iPhone 13 Pro Max, it’s going to be 428 x 926 because it is a logical size. There is a scale factor of 3. So, each one of the 428 points has 3 pixels. Therefore, the physical size is the logical size’s multiplication by 3. The scale factor changes according to the device and it’s hard to remember this for all of the iOS devices. You may check online the device’s scale factor and update the frame’s size on Figma, yes that’s an option but we wanted to make it automated and a basic thing as a first product.
Use case
As a mobile developer, I use this plugin in order to see if I developed the app’s UI correctly. My designer friend, Ersin, also checks the app to give feedback to the development team. In addition to them, Ersin also takes screenshots from other applications, imports them to Figma, and observes the size of the components, margins, and paddings.
Finding the Solution
The solution was clear actually. We have the screenshots. We know devices’ physical size, scale factors, and logical size. We thought there should be something to convert the screenshot’s frame size ( physical size in this case) to the logical size.
We planned to save all of the iOS devices’ physical sizes in our plugin’s codebase and when a screenshot is selected on Figma, run the plugin, and resize the screenshot to the logical size by diving by the scale factor.
Let’s start building a Figma Plugin
My favorite two resources during this journey were:
- A video on Youtube
- Documentation of Figma’s Plugin API
- Apple Devices’ Resolution list
If you haven’t already installed VSCode, Node.js, TypeScript, and Figma Desktop applications, I recommend you install them before you start developing. For this, you can follow Figma Plugin’s Setup Guide.
Get Know - How
Before diving into the development of my product, I watched the Beforementioned tutorial and followed the steps in the tutorial. I learned how to develop a Figma plugin with that tutorial and while I was watching that, I was already thinking and planning about how I would develop my product.
Implementation
I first understood the Figma API during the example projects. During the implementation, I was communicating with my product partner Ersin about this product. I shared what I learned with him and we discussed whether the plugin should have a UI or not. He suggested not having a user interface.
Then, I checked if I am able to get the frame’s size and yes, I am able to. So, I started with getting the frame’s size information and then save all of the device sizes which I get help from iOS Resolution I also, saved the information for the device model and the scale factor. The reason for saving the device information is just to note down which devices this plugin is going to support and see the same size devices clearly on the codebase. Therefore, in a few weeks people will be able to see if we support the new iPhone 14 - Hopefully, iPhone 14 will be released on September 7, 2022. The reason for saving the scale factor is, that we planned to divide the frame size by the scale factor to reach the logical size. Then, I implemented the way we were thinking. Developing a Figma Plugin requires knowledge of TypeScript. Since I know TypeScript I didn't get help from any resource at this point.Finally, it is done. We started it with iOS devices because Android has various devices of different sizes. We made the plugin open source by releasing the source code, so it is open to contribution. You may reach the source code from here.
So, let’s watch the demo video and make it more visual.
Here, I took the screenshots from Xcode’s simulator and I created the same device’s prototype frames on Figma. I import the screenshots and they are bigger than they should be. So, I run the plugin and the size automatically changes according to the scale factor. I use this plugin to see if I met the design correctly. I take a screenshot from the app that I am developing and check it with the design. It made my job easier because now they have the same sizes.
 Source: Photo by Sigmund on Unsplash
Since my childhood, I have always loved creating things. I created this plugin in a day and in the following days just did some tiny improvements but it’s created in a day. I was feeling accomplished when I went to bed. I was also regretting why I procrastinated in the first place. So, If you would like to build something but procrastinate, start today. It is such a good feeling that I created the product that I use almost daily in my work and it is nice to see other people use it as well. I hope you liked this article, if you have any feedback about the plugin or this article, meet me in the comments below. If you enjoy my articles, please react or subscribe to my newsletter. Thanks for reading, happy coding! 👩🏻💻